Monday, November 30, 2020

Star Wars Shards of the Empire Season 02 "Restore the Faith" Episode 01 "The Force Is With Me" Part 1 "Life Debt"

Star Wars Shards of the Empire Season 02 "Restore the Faith" Episode 01 "The Force Is With Me"

Part 01: Life Debt

Balyn Tosh and Tracker Tam stood on the outskirts of Niima Outpost watching their YT-1300 freighter "The Rusty Gundark" take off from the "New Republic" outpost headed for who knows where.  A day before the New Republic had commandeered their ship to transport supplies off Jakku.  "You know last year I was fighting terrorist above Endor and now those same people are taking off in our ship" Balyn sighed.  "Yeah strange galaxy.....  Was that part of the engine flaring flying off?"  replied Tam.  The Zabrak looked over at her companion "Hey the voucher they gave us if they don't return the ship is worth more than that hunk of junk."  "Only if we can find someone to honor it" replied the ex-imperial.  


Back at their camp a curious sight awaited them.  Their shipmates Anno Sune and her B2 battledroid companion 00-C were talking to a Wookie.  Sune's head tails twitched like they always did when she was negotiating a deal.  "I wonder what she's getting us into" Tosh mused.  "Hey guys this is Jondara.  He says he needs our help rescuing a clone trooper captain called Stalker" the orange Twi'lek explained.  "Well I thought this day couldn't get any stranger but I seem to be wrong" replied Tam.  "The pay is a thousand creds and a trip off this rock" the Twi'lek said hopefully.  "Guess we got nothin better to do" Balyn agreed.  


Jondara explained that his friend "Captain Stalker" had rescued him from a Separatist attack on his home world during the Clone Wars but he was wounded in the process.  After being medically retired from the service the two had joined an order of monks called "The Guardians of the Whills" on a planet called Jedha.  The Guardians had taught Stalker to use a Kyber Crystal and force meditation to control his accelerated clone aging.  After the destruction of the Holy City the two had joined the rebellion but since the fall of the Empire Stalker had been trying to get help to liberate Jedha from the Imperial Warlord Moff Korrath.  The New Republic had declined to help liberate the planet so Stalker was looking to recruit a resistance.  They had traveled to Jakku to look for former rebels who might help them.  Unfortunately Stalker had been tricked by a bounty hunter working for Moff Korrath and captured.  During the fight his Kyber Cristal had been destroyed.  The bounty hunter had sold Stalker's armor to a band of Jawas in Scrapper Town and was waiting there at a comm station for his partners to pick him up.  The Wookie was adamant that they needed to rescue Stalker and his armor.  


Upon reaching the outskirts of Scrapper Town Jondara insisted that they recover the captain's armor from the Jawas first.  Although the crew didn't understand this logic they decided not to argue.  Everyone knows it's not wise to upset a Wookie.   
 

As they made their way down the dusty street towards the Jawa's bunker four old B1 Battle droids emerged from the structure.  "Halt!  By order of Clan Ooo'dora that Wookie is not allowed in Scrapper Town!" all four droids proclaimed over their metallic vocabulators.  
 

With a Wookie battle cry Jondara charged one of the droids and sliced it's arm off with his vibro knuckler.  00-C charged towards another of the B1s.  "By order of Separatist Alliance directive 062-386-1138 you are ordered to remand yourselves to the command of a superior model." the super battle droid said as it smashed it's hand accuator into the head of the lesser droid.  "Roger, Roger by your command" the other droids replied in unison.  
    

Unfortunately 00-C's crewmates cut one of the B1 droids down in a hail of blaser fire while the Wookie literally shook the one he was facing to pieces even as the poor droid exclaimed "Ssssammmme side! Same siiiiiiiiiide...." out of it's broken vocabulator.  
Three Jawa emerged from a hatch on top of the bunker and began taking shots at 00-C with their Ion rifles.  One scored a direct hit causing arks of Ion energy to flash across the droids shiny surface for several seconds.   
  

00-C moved towards the bunker firing his wrist mounted repeating blaster .  One of the scavengers was struck but not killed.  The Jawa returned fire and another blast hit 00-C "Systems operating at twenty eight percent initiating self repair protocol.....  Systems restored to seventy five percent efficacy" the droid explained as he trudged on.
    

Unfortunately for the super battle droid it marched right into a Jawa ambush.  Blue energy sparked across the droid's armored structure.  00-C dropped to the ferrocrete floor with a loud clang.  


Under the covering fire of the crew and their new droid allies Jondara leapt and vaulted over the top railing of the bunker.  With a roar he picked up the last rooftop Jawa and threw him over the railing into the side of an adjacent building.  The poor creatures scream was cut short as his body hit the building with a thud then fell to the ground dead.  
 

Anno and Balyn moved up and engaged the Jawa inside the bunker wounding one but the creatures fired back taking down one of the B1 droids.  


A heavy blaster shot hit the ferrocrete bunker just above Anno's head.  She turned and spotted an armed figure firing from the roof of the town's comm station.  "Sniper!" the Twi'lek yelled.


Inside the bunker 00-C's system rebooted.  "System online.  Operating at minimal efficiency" the droid intoned.  Standing in one sudden movement the massive droid stepped over and smacked one of the Jawa over the head with it's metallic fist dropping the creature just as Jondara was finishing off the other.  


As the rest of the party moved against the sniper Balyn Tosh's R5 astromech droid "Blooper" began repairing 00-C.  "Bloop, bloop!" the little droid chirped.  "Systems restroed to ninety eight percent efficiency."  reported the B2 droid.  "Good work R5-B4".  "Bloop, bloop" the astromech replied.  
  

Balyn, Anno, Tracker, and Jondara moved down the street towards the comm station trading fire with the Bounty Hunter on the roof.  As they reached the building the Wookie began climbing the wall.   
 

The Bounty Hunter turned and shot Jondara as he pulled himself onto the roof.  Undaunted the Wookie charged the man an hurled him off the roof to his death.
   

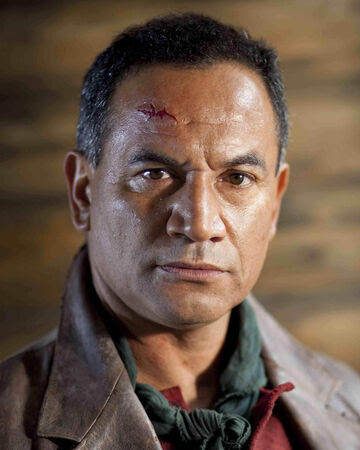
Inside the building sat a man who's face matched those on countless Republic propaganda posters from the Clone Wars sitting cross legged on the floor.  Over and over the man repeated a simple mantra "The force is with me.  I am one with the force".

Game Master Notes: This was the first session of my 2nd Star Wars Shards of the Empire campaign set just after the fall of the Empire.  In the first campaign former Rebel Alliance pilots were hired by the Queen of Naboo to help her pirate Ally Nym destroy a dangerous squadron of TIE Advanced pilots known as "Storm Squadron" out of the Lok system.  This campaign follows a more rag tag crew of smugglers as they are drawn into a war between a power hungry Imperial Warlord and the followers of various Force based faiths on the holy moon of Jedha.   


Wednesday, September 30, 2020

"Beyond the Northgate Passage" my "West Marches" style AD&D 2E Campaign.


The current Player map for the campaign of the area around "Fort Venture"

A couple of months ago my role playing games group started a new Advanced Dungeons and Dragons 2nd Edition campaign in the "West Marches" style I named "Beyond the Northgate Passage".  This is actually the 4th West Marches style game I have run for my group in the last few years.  We've found the format good for the type of group that we have as we are often unable to make regular sessions with the same party members.  


Our previous West Marches games have all used the current 5th Edition of the Dungeons and Dragons campaign published by Wizards of the Coast but we have instead decided to go a bit more old school and use Advanced Dungeons and Dragons 2nd edition.  We found 5th edition characters were too powerful for exploration games.  It's just too easy to rest up between fights and characters have few reasons to return to town or engage in diplomacy for that matter.   

The setting map.

One thing I have learned about running "West Marches" style games is that they require a fair amount of upfront preparation.  You don't have to work out every details of the setting you are using but as the game relies heavily on player driven exploration rather than guiding the party down an adventure path the DM needs to know what is going on in the areas that they Player Characters are exploring.  

I went a little aggressive at this stage of planning and tried to lay out most of the locations of things like monster lairs, dungeons, ruins, tribal camps, and other points of interest which resulted in a lot of information to work from.  I have started detailing those areas near the starting town first but just having the names and a little information about what kinds of things exist on the frontier has made it easier to get this campaign up and running.  

I've found it is good to have a lot of low level encounters and points of interest near the starting town in a West Marches game but it is also good to have some high level content.  This is important not only to provide some more interesting play for characters who have returned to town on business but also to add a sense of danger at all levels of play.  There needs to be some mystery for low level areas that will make players interested in coming back to explore areas after they have leveled up a bit. 

In a West Marches campaign it's best not to view the Player Characters as "Heroes" though they can engage in heroic acts.  In a previous campaign most of the player characters were involved in thwarting a demonic incursion which left many of them in positions of power and influence.  This is not however the typical goal for this kind of campaign.  Exploring new territory and gaining individual riches and power are the more typical motivators.  

Explorers investigate a crypt some dwarven miners accidently opened while excavating.  Though they gained some treasure they decided not to proceed further into the crypt due to the inexperience.  


In this campaign the Kingdom of Knottinglund has defeated the hobgoblin "Razor Rock Legion" who held "Razor Rock Keep" which guarded the Northern Wildlands.  Rumors of ancient riches and abundant land and natural resources have drawn dozens of treasure hunters and explorers to the region the player characters among them.  

The "Wildlands" are an extremely dangerous regions filled with aggressive tribes of humanoids and barbarians and broken civilizations of xenophobic elves and dwarves.  The land itself is dangerous and difficult to traverse but full of opportunity for those bold enough to seize it.  


A fine and often forgotten miniature battle rules set fully usable in an AD&D 2E campaign.

Another aspect of the "Wildlands" is that most of the factions are hostile and in order to truly take advantage of the opportunities presented them Player Characters won't be able to rely on personal heroics alone to save the day.  They will have to take command of armies as the kingdom expands settlements in the region.  I plan to employ TSRs brilliant "Battlesystem" miniature rules for the 2nd Edition into the campaign.  Player characters will have to recruit followers and hire mercenaries to help deal with large scale military threats.

At this point even the most experienced characters in the campaign are just reaching 2nd and 3rd levels but they are already getting invested in building up the region.  Due to an early windfall three of them have started building establishments of their own further into the region after being granted lands and permission by the local lord to do so.  No doubt they will have to defend their new holdings and build roads and bridges to increase the size of their little hamlet.  

Archers and Soldiers from "Tres De Aurum Legio" mercenary company who have recently establish a garrison at the former Hobgoblin stronghold of "Razor Rock Keep".


Although we are several sessions in we are still very much in the process of grinding through lower level content.  The goal for the moment for most of their player characters is to gain wealth and influence in the region before exploring the more interesting areas but that is to be expected.  The lower power 2E rules really play well into this as they limit the speed at which PCs  gain power and provide more reason for them to be more strategic in their actions.   

I don't plan to detail every single "adventure" in this campaign but I hope to keep frequent updates about the campaign progress over all.  I will be including some reports of the more interesting sessions as well as significant battles that take place in the campaign.   


Tuesday, May 19, 2020

Cavaliers and Roundheads Episode 5 Skirmish at the Old Mill Ford


November 8th, 1642.  Captain Hewitt had heard that not all the supplies had been recovered from the Royalist camp at Edgecote.  Of particular note were two large barrels of powder and several hundred lengths of match cord that had been stashed in a small barn.  He decided to dispatch Sargent Osbury and Mable banks with a few men to gather the supplies and bring them to Banbury Castle to add to the garrison's stock.  

The supplies were easy enough to find and after loading up the supplies on donkeys and an oxcart they headed back towards Banbury with the intention of crossing the river Cherwell at Cropredy Bridge. As they approached the town they saw a gentleman riding towards them at full gallop.  The man brought his horse to a stop and demanded to know who the Royalist were for.  Charles replied "For the King!"  "Then you should know that Cropredy Bridge is being held by at least 30 Parliamentary militia.  I've just barely escaped from there myself." replied the man.  At that the gentleman spurred his horse on and disappeared down the road.  

Mable spotted a wooded ravine about a hundred yards off the road so the Royalist party decided to hide there until they could decide what to do.  As they were discussing their options a farmer heading towards the town seemed to have spotted them so they decided to move south along the river to look for a fording.  
 

They found a ford about a half mile south of the bridge near an old ruin that looked to be some kind of mill.  Mable scouted ahead and didn't discover any problems so they decided to chance a river crossing.  Sargent Gryffon and three musketeers took up a position on a hill overlooking the ford while the rest crossed with the supplies.   


Things were going well until suddenly two troops of Parliamentary soldiers sprung from their hiding places. One group was hiding among the trees on the opposite bank and another among the ruin.  
 

One of Sargent Gryffon's musketeers was shot down in the first exchange as the Roundheads advanced on their position.  


Sargent Osbury, Plunket, and Towne were caught in the open crossing the river.  Towne was hit but only lightly wounded.  The Royalist returned fire but had little success against their enemies well covered positions.  


One of the Parliamentarians advancing up the hill was shot down by Gryffon's men but they still had an almost two to one advantage.  
 

Charles spurred his horse onto the bank and charged one of the Roundhead musketeers running him down with his charger.  He discharged his pistol and wounded another.  Two of the enemy retreated up the hill.  


Continuing his charge Charles cuts down another trooper but he is shot by his companion.  The wound is not serious however.  


Towne is able to reach the opposite bank and reload.  He then shoots another enemy trooper killing the man instantly.  

Mable Banks abandons the oxcart and moves to aid the musketeers holding the hill.  She fires her crossbow at one of the trooper hitting him but not seriously.  The trooper turns to fire at her but misses.  Sargent Gryffon makes a desperate charge down the hill wielding his partisan and wounding one of the enemy musketeers.  
  

After finishing off the Parliamentarians on the hill Sargent Osbury charges down the hill at the others.  Plunket makes it to the bank and both he and Towne take down another Roundhead.  Plunket is however shot down himself.  


After cutting down two foes Sargent Gryffon is knocked out of action by enemy musket fire. Things are looking bad for the Royalist on the hill.  
  

Mable Banks falls back as one of the Roundheads chases her wounding her lightly in an exchange.  Eventually he gives up the chase and returns to his fellows.  


The last three Parliamentary militia men manage to take up the rest of the Royalist musketeers on the hill but not before all three were wounded.  


Charles runs down the last of the Parliamentarians on his side of the river.  Towne manages to staunch Plunkets wounds saving his comrade.  After securing the Western bank Charles turned and charged back across the river on his horse.  Towne turned and drew a bead on of of the Parliamentarians who had retreated into the ruin.  Despite the cover and range he shot the man dead.    
 

Mable Banks and Sargent Osbury killed the trooper that had been chasing her the moved to engage the last of the enemy.  The man threw down his musket and surrendered.  


After tending to the wounded amazingly only one of the Royalist had been killed.  One of the other Parliamentarians had only been knocked unconscious so with their two prisoners they set off towards Banbury.  

When they arrived and told Captian Hewitt of the Parliamentarian forces at Cropredy Bridge the Captian was quite concerned.  "We'll have to deal with them soon of they will become a thorn in our supply lines" he said.  

Notes:  I've just received an order of Swashbucklers from Brigade Games which is good because I'm running out of ideas on how to keep using my small 17th century collection.  I have a much larger order in route from Warlord Games including their English Civil War starter army so I can do some much bigger skirmishes. Level progression in the campaign is going fairly slowly but that is fine by us.  D&D characters can get pretty powerful for historic games even when they don't have magic.  So far it's working fairly well though.    

Monday, May 18, 2020

Cavaliers and Roundheads Episode 4 How now King's Cow


November 5th, 1642.  Currently stationed at recently captured Banbury Castle Captain Hewitt has dispatched Sargent Charles Osbury and Mable banks with Plunket and Towne to travel to the market at Wardington to pick up a small herd of cattle from Edmund Bray which were to be used to provision the King's Lifeguard.  The cattle have been paid for but they must be driven back to the castle.  

Upon arrival in Wardington the Royalist party discovered that Edmund Bray had been killed by a troop of Parliamentarian militia and the King's cattle stolen.  Their trail was easy enough to pick up.  They were heading east into a stretch of wooded area.    
    

After tracking the cattle thieves for about an hour they came up on the rear of the Parliamentarian column.  The militia members were having a hard time controlling the herd as they traveled through the wood.  As the Royalist were planning their attack they heard someone shout out "Stop in the name of the Queen!"  It was the Sir Roberte and his party challenging the Roundhead men.  He was apparently still under the delusion that Queen Elizabeth had returned from the grave.     


Mable, Plunket, and Towne took up a position on a hill behind the Parliamentarians and took aim at two of the men trying to catch up to some wayward cows.  Charles waited just behind the hill on his charger ready to join the fight.  
 

Sir Roberte and his party began to argue with the enemy soldiers.  The Roundheads seem both confused and amused at his insistence that Queen Elizabeth was alive and trying to regain the throne.  At first they began laughing at his but when they realized he was serious they fell into formation and raised their muskets.  
  

As the shooting began the Royalists joined the fight picking off the stragglers of the Parliamentarian militia.  


Sir Roberte and his party defiantly charged the green coated soldiers leading the cattle, taking down several of their number.  


As Sargent Osbury charged past a thicket a Parliamentarian marksman hit him in the back, wounding him badly.  


Sir Roberte continued to create havoc among the enemy troops supported by his motley band.  The green coats continued to fall back under his charge trying to find cover.  Though old and addled Sir Roberte was still a fearsome combatant.    
  

Charles spun his horse around and charged the marksman that wounded him discharging his pistol at short range almost exactly as Plunket shot at the man.  Both shots struck the Roundhead and he fell among the scrub.  


The militia scattered in all directions confused as to who was attacking them and from what direction.  A young woman in Sir Roberte's party was shot, causing his squire and another woman to charge the shooter and cut him down in their rage.  
 

Mable Banks ran to help the wounded woman and although she was able to keep her from dying she was challenged by the Knight's followers so she withdrew.  


Sir Roberte charged Charles as he came around a hill giving him a buffet with the handle of his hammer despite that fact that Charles has just shot one of the green coats.  "Stay out of this King's man!" The knight shouted.   


After the last of the Roundheads had been dispatched the Royalists and Sir Roberte's party stood apart from each other once again.  The herd had begun to scatter in every direction during the skirmish and there was a real chance most the herd would be lost.  Charles asked for a temporary truce to prevent this from happening and Sir Roberte agreed.  


With both parties working the herd was once again gathered together.  Charles promised Sir Roberte that if they helped get the cattle back to Banbury castle he would try and find better lodging for the "Queen's" court.  Roberte agreed and the whole host set off together.  

Captain Hewitt was amused by Sir Roberte and his party.  As a reward for helping bring in the herd Hewitt granted the old knight a run down manor outside of Banbury for he and his "Queen" and promised him that he would set up an audience with King Charles to resolve the matter of the two rulers.  The Captain of course had no intention of actually approaching the King about the old man's Queen but Sir Roberte fell for the ruse and was quite pleased.  

Notes:  It's been almost two weeks since we played this game but I've been really busy and unable to Blog.  We've also had another session since that I will also need to get put up.  The details about this game are a bit fuzzy in my mind but this is a pretty fair representation of the events.  I hope to have Sir Roberte show up in the future to cause more mischief for the player characters.  Eventually he will likely go away if he doesn't get himself killed but we shall see what the future holds.