

One of the reasons we didn't try any of the new editions was the cost involved in getting back into the game itself. Recently however Games Workshop has come out with new starter sets with lower entry level cost so we picked up the "First Strike" boxed set. First Strike is the cheapest of the new introductory boxed sets so we picked it up for $40.00 at the local game store. I was really impressed with the 6 Marines and 9 Nurgle Death Guard minis that came in the box. I decided to paint up the Death Guard Plague Marines first because they looked like the biggest challenge and the most fun.
They seemed perfect for my new black and white under-painting technique with glazes so I snapped them together and base coated them.

I used Dupli-Color Sandable Automotive Primer for my base cote. Someone turned me on to this years ago and it has been my go to for metal and hard plastic miniatures since then. It's not very cheap. I think my last can was around $8.00 but Games Workshop charges a lot more for their spray primers so it's not that bad. I don't use a whole lot of "pro" miniature painting products. I just prefer to spend my money on miniatures and terrain than paints.

Although I recently posted these techniques on this blog I'm starting over again from the beginning. After cleaning up my black under-cote I chose a medium grey for my first layer of dry-brushing.

One of the things I like about this technique is that you can see all the detail on the figures up front. I usually paint over a black under-cote but my vision isn't quite what it used to be so it's nice to be able to see what is going on.

After the medium grey I choose a lighter grey for my next dry-brushing cote. As I said in the previous tutorial make sure you clean your brushes often. You also need to dry the brush out fairly well before loading it up again.

In my other tutorial I stopped here. Most of the miniatures I've painted with this technique I've started glazing at this level.

This time I've chosen to do another layer of dry-brushing here with a pure white because I really wanted to pop out the details.

One thing I'm not sure that I noted is that I tend to paint lighter at the top of the miniature. I didn't even go below the waist line with the white. I think this works well to draw the eye to the top part of the miniature. The effect is subtle but it really worked out on this job.

In order to create my glazes I use Pledge floor finish mixed with acrylic paint. This is the old "Future" floor finish that has been used in the wargaming, model, and film industries for years for creating glazing techniques.
I went with Iguana green because it had a good Nurgle look.

I like to use a fairly soft round brush to deliver my glaze onto the models. I used a Citadel "Standard" brush for this. I do buy some Citadel products for painting just not their paints. Here I have glazed the armor of the Plague Marines. I try to work for largest area to smallest with this technique since it's a fast method but not very forgiving. If you make a mistake you can lift glaze off of areas with a damp brush but it's best to try and keep the paint where you want it.

I picked up this coral color for the tentacles. I started to go with a lighter pink color but when I tested it on my table it looked too weak.

The coral color worked out pretty well. I'm developing a pretty good eye for what a glaze will look like over the under-painting. This takes time like using any other technique.

I then chose a spice tan color to glaze the bones. I'm planning on picking up the highlights on the after I'm done with the glazing.

The bone color looks pretty good here. I don't think it would look too bad even if I decided not to highlight it. This technique is kind of a play at your own level. It looks pretty good to just do the glazes and the final wash but you can layer over the glazing as much as you think you need to.

Being Plague Marines these guys have a lot of boils and sores even on their armor. Such are the gifts of Nurgle. I chose to use this antique gold color. I've also painted the skin tone here on the champion using a medium flesh.

Like on the bone I plan to highlight the boils and sores after I do the over all wash. You can really see the minis come together at this point. Another reason I paint largest area to smallest is because each stage goes faster than the other.

The middle guy here "Boba Fester" has a loin cloth and a tie rag around his gun. I chose this oxide brown for those but I also used it on the other figures for the ribbed hoses and the few places the armors under-suit shows.

I mixed equal amounts of black and phthalo blue to glaze the housing on the guns. Phathalo is a strong pigment so it holds it's own with black. I could have just used black but I like a little blue in my black highlights some time especially in this case.

A lot of the pictures I've seen of the Plague Marines and other Nurgle figures have had tentacles with purple tips. I wanted to replicate that on these figures because I really like that look.

The purple worked out really well and it looks great with the green armor. I think it gives the tentacles a real living look. When painting a glaze over another glaze it is important not only to make sure the base glaze is dry but also to make sure the over glaze is weaker than the under glaze so the highlight hold. If you need more color in the shadows just apply additional layers of glaze to the shadowed areas.

Now I'm too the metallics. I mix Black and Silver to get a gunmetal color and paint all my steal bits straight with this. This is not a glaze. I do thin the paint a bit but only enough to get it to flow.

On some minis I've left my steel bits with just this color depending on what I want the end result to look like. On these I used some pure silver to highlight a bit.

A couple years ago when I was painting a lot I had a good formula for gold but I lost track of it. Usually I add in a little dark brown or copper with a brighter gold. I'm still trying to find something that works as well as what I used to have.

After I finished these guys I noticed that a lot of the Plague Marines had more gold on them that I used. Every single plate was bordered with gold. I also saw some really simple Plague Marines without any gold or metallic on the armor at all and they looked fine. With all the extra gold bits hanging off their armor I decided not to do every piece of armor. I use this technique as a speed painting technique so I also made the choice because I felt it was going to slow me down too much without giving me much.

So now I'm ready to make the magic happen with the final wash. I'm using Agrax Earthshade, another Citadel product, as my over all wash. This step is pretty critical. As I said earlier this technique is not very forgiving. If you bleed over color onto a part of the miniature you don't want it on it's hard to take it back off or cover it up. You can re-paint the base cote and do another glaze but it is best to just be careful. However where details come together you are going to get some bleed. You can see it clearly on the tentacle on the Champions leg where I wasn't able to lift the paint that bled off. This stage will fill that in and it won't show up. Not only that it will tie the figure together and make it look like you spent hours carefully blending layers.

I could not have been happier with the results of this ink wash. The Citadel ink washes are really impressive. I'm more than happy to spend the money on them. If you look close you can see that I missed a couple details. Mostly a couple of the little gold flies and a couple really subtle tentacle tips. I would rather have not missed these but it's pretty easy to fix them at this stage.

Another trick I've found is that the Citadel Reikland Fleshshade makes a pretty good subtle rust effect. I considered doing a lot of rusty weathering on these guys. I've seen some done that way but again time was a factor so I just went with a little rust.

Here you can see the effects of the fleshwash on "Boba Fester's" gun barrel. Also I'm ready to bring up the bone parts. I'm mixing some of the Spice Tan with Ivory for the highlight.

Like I said this is a technique I could have skipped but in this case I really felt like bringing up the bone parts was important. It didn't take me long to apply in thin layers.

Also like I said I decided to add some highlights to the boils and sores so I again mixed the ivory with antique gold and used thin layers to highlight them.

I'm really glad I decided to take the steps of highlighting the boils and bones. It only took a few minutes for this step and it really worked. Just look at all that sexiness......

The minis are basically done at this point so it's time to work on the bases. For the last few years I've been using three levels of dry-brushing to finish my bases. Here I have chosen burnt umber a medium tan and a light tan.
I always thin down the first cote quite a lot to get a little extra depth from the black base cote. Sometimes I will add a layer to the lip of the base but not very often. This cote usually takes a long time to dry but you really need to let it dry before moving on to dry-brushing. For some reason when I do this I always end up with one mini who's base won't dry as quickly as the others. This time it was "Mr. Trencher" the figure on the right that gave me trouble.

Here is the medium tan layer dry brushed on. There seems to be a lot of debate on how to finish the edge of the bases on these types of figures. I used to paint the base edges black because that looks really nice when the figures are on display and not on terrain and it looks clean for photographs but it looks kind of jarring on the play table. then I starting painting the base in the darkest color I used on the base but lately I've just been dry-brushing over the edge giving the model some texture. I find this looks the best on the game table.

Here is the final light tan dry-brush. I think I chose a good color for my Nurgle force. Keeping bases all the same color when building an army is really helpful for creating a uniform look even if your figures are painted in different colors.

I chose some bright green static grass for these guys. I thought it would contrast nicely with the pinkish/purple tentacles.

One thing I've learned when using static grass is that you need to take a little time with it. I paint on full strength Elmers Glue-all pretty heavily then I press big clumps of static grass on to the glue. Then I wait at least 10 minutes to shake the excess back into the container. If you shake the static grass of too quickly or paint the glue on to thin you usually end up with thin patchy grass.

As you can see the static grass looks nice and thick here. Now these guys are basically finished and ready for clear cote so your cheeto munching friends don't completely ruin them during game play.

I'm using Testors Dullcote for my clear cote. It's pretty much an industry standard. I've not found anything flatter and that's important because my glazes have been built up with a slightly glossy floor finish.

I like using a clean surface to clear cote whenever possible or to at least I try to avoid one I've used pigmented paints on to avoid accidental paint transfer onto these finished models. I also make sure to leave enough gap between my models so that I can spray around the group and get good coverage on the sides. Be careful not to space them too far apart. If they are too far apart then particles of the clear cote may tend to dry out in the air and cause grainy texture. This is also a problem when applying a base cote.

After the initial cote has dried I turn the models on their back and spray another cote from the bottom then when that dries I turn them on their front for the final cote.

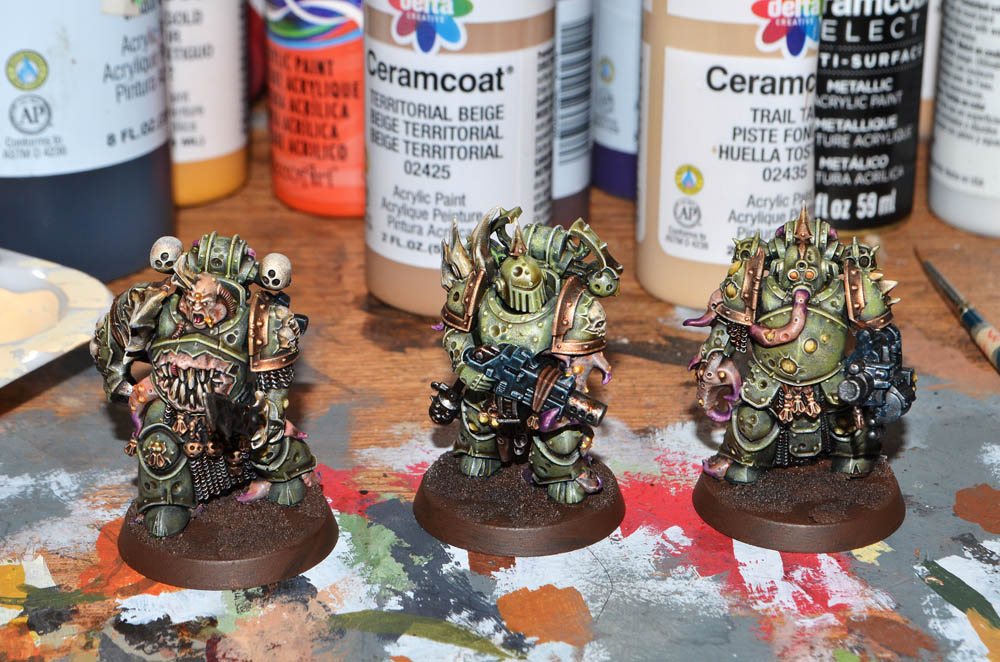
I think these guys turned out pretty good especially for my tabletop standards. all in all I finished them in just a few hours. I could have probably got them done quicker but I chose to add a few more details.
No comments:
Post a Comment