Monday, August 23, 2010

Processing plant primed and more

Well I did a little more work on my spaceports refinery/processing plant. Here is a shot of the primed model. It's always nice to get to this stage so you can see how thing thing holds together. I'm planning on doing a lot of weathering on this project. Most of the Venture Star equipment is going to look heavily used.

I'm also pretty sure I'm going to change the name of my setting. The setting as a whole will be called 3031 A.D. and this outpost will be called Station 42. I decided Star port 69 sounded a bit too "swinging" for how the project is turning out. Don't be alarmed though because I still plan to do a seedy dive of a bar with pole dancers and the like for part of the project. Eventually I might put in a fancy star port but for now I'm going for more of a truck stop kind of feel.


As I said in previous post I'm planning on making this a kind of "living" setting and I'm building it and developing the setting for various games and game types. I've been considering various different role playing system to try out first including Savage Worlds and Traveler but I decided on D20 Future which is based on the D20 Modern system.

I chose this system for a few reasons. For one thing I own the books. D20 Modern, D20 Future, and D20 Modern "Future Tech". I don't own Traveler although I do have a somewhat questionable digital copy of the rules I'd rather have a book to sit down and work the game out. Savage Worlds is a great game system but it's pretty basic when it comes down to it. Pretty good for beer and pretzels but I wanted something with space combat rules in it so I didn't have to do all that work myself.
Pretty much everyone in my group has played some kind of D20 game so it will also be easier to pick up especially since I'm not using any kind of magic or psyonics in this setting. I'm also tired of buying new books at the moment and it is unlikely that anything new will be published for this system. So I have just enough of the work done for me to get me going, a familiar system, and some decent rules to expand with new equipment and vehicles.


Tuesday, August 17, 2010

Ore processing plant for spaceport WIP

I'm trying to wrap up this little ore processing plant for my spaceport. I've added a couple small details since I took this picture but this is pretty much what it looks like. I've got a couple more details to add and then it will be ready for a base cote. Scratch builds like this always look like a mess until you get the base cote on them. I think it's going to look pretty good.

I tried not to go overboard with the detailing but I wanted to change the shape of the containers I used a bit because so much scratch built terrain out there is made up of easily recognized containers. Sometime this produces good results but a lot of times the tables end up looking like they are covered with nothing but painted soda cans and food containers. Of course those items are good for terrain building but it helps to dress them up a bit so they don't look so mundane.

Sunday, August 15, 2010

Star Port 69 "You'll never find a more yadda, yadda"

We've finally got enough buildings far enough along to set them up and a table and see how they look together. We decided to elevate many of the buildings so we could easily place them in any kind of terrain without having to worry if the bases matched. Also I think it helps lend a more sci-fi feel to the project.

I have to credit my wife for making all the building pictured except for the ore processing platform in the upper left of the table. Most of the building pictured are a work in progress. The only "finished" building is the small workshop in the lower right corner of the table.

I'll be adding more post soon with construction details on the individual projects. I'm really happy with the progress so far.

Saturday, August 14, 2010

Rectangular cargo containers from disposable razor guards.

Ever since I did my cargo containers from coke bottle caps (pictured in the back) I've been looking for a super cheap way to make rectangular containers. Round containers are fine for chemicals but most items are not shipped in barrels. I've searched high and low for something cheap and easy but with little luck until I happened on these. I was needing a shave and I was out of razors and low on money so I ran into my local Dollar General store and picked up a 12 pack of Dollar General brand razors for $1.00.

To say the least it wasn't my best shave but I did discover that the blade guards for the DG brand razors would make great little cargo containers with a little work. The little U shaped divots you see in the containers were voids in the plastic guard. I knew I would have to deal with these open spaces to make effective containers. My solution was to super glue short lengths of round toothpicks on the back side of the guard before I glued two guards together to make the container.

After putting them together I simply base coated them with some primer and painted them up. Not quite as simple as the coke cap project but cheaper when you think about it. I got six crates for a dollar and the plastic handles of the razors will also make nice bits for terrain projects.

After buying the first pack I went back and and picked up two more packs. I'm sure I'll be picking up more in the future. I'll have a whole hold full of these things for just a few dollars. If you have a Dollar General in your town you might want to give it a try. I wouldn't bother using the razors for shaving. Between the containers and other useful terrain bits I think it's a pretty good value as is.

Thursday, August 12, 2010

"Spaceport 69" the plan so far.

Well I've gotten pretty stuck in on my space colony project. I've got a few ships done and more in progress. We've finished one of the buildings and have another on the way. I've started some of the dedicated minis and other vehicles for the project so I thought I would lay out some of my ideas on the project and where I'm heading. Mostly because I'm away from the house right now and I have time to kill. :)

The major inspirations for this project come from Skank Games "Zombie Town" and Matakishi's "Off World Colony". I liked the playability and completeness of Zombie Town and the repetitive forms of the Off World Colony and the fact that I've been wanting to do a space colony for some time. I wanted to make something of a combination of both projects. I want my outpost spaceport to be as playable as Zombie Town yet simple and futuristic looking like the Off World Colony. Another inspiration from Zombie Town is that every building has a purpose. My idea for the spaceport is that not only will every building have a purpose but a population of citizens and employees. That is every business will have employees and every house an owner. Of course there will be cross over.

Another major concept I'm going for is that the spaceport will be a living setting for multiple games. What happens at the spaceport and surrounding area in games will effect the development of the project. As I add new buildings and colonist they will become part of the story line. This way the project will expand in a hopefully logical or at least interesting manner.

As far as the setting goes I'm doing the spaceport set somewhere in our solar system some time in the 31st century. Like 3031. I don't have a lot of background on the setting done yet but man has basically been colonizing the solar system for 1000 years. The colony will be on one of the moons in the outer solar system but I haven't decided which one yet. There is no FTL but there are several terraformed planets (mostly moons actually). Imagine the Firefly/Serenity setting but in our solar system instead. Most of the "planets" probably won't be as heavily developed and the colonies will be a little less "down home" and more self sufficient. Less trees ect than in Firefly. Mars is a communist state. The Jovian system is a monarchy. Earth and the other planets have a loose "Alliance". The Vatican has moved from Rome to a massive space station near the asteroid belt.

Although they colony will grow and develop during game play I am going to start with a few established facilities. One will be the "Venture Star Prospecting" base. Another will be "Rosie's Scrapyard and Repair". The third will be an as yet unnamed fuel station which will be set up kinda like a truck stop in space. There will also be a few "habs" mostly for the fuel depot and prospecting employees. Outside the colony I will be adding a pirate base, Martian outpost, and some ruins of failed colonies complete with "wasteland" scavengers. I will probably start using the outpost for games after I get the facilities of the outpost itself done and then I will try to get some of the surrounding stuff like the pirate base done shortly after that.

Anyway that's the plan so far. I've been wanting to do this kind of thing for a while. Wish me luck. :)

Monday, August 9, 2010

Venture Star Prospecting: Team 1's excavator.

Another piece of Venture Star's heavy equipment is done for the spaceport project. This is team one's excavator. This little piece of machinery came from the same Dollar General toy set as the dump truck I just finished.

Here is a shot of it with the dump truck. I'm pretty happy with the way it turned out. It's a little more in scale than the truck itself and the weathering turned out pretty good. I didn't put as much into this one as the dump truck because I didn't name this vehicle. Still I think it stands up nicely with the truck.

I used approximately the same formula for the rust spots on the excavator as I did the dump truck but they of course came out much more orange looking on the lighter colored excavator. I don't think it looks bad but if I could do it over again I'd darken it down a bit more.

I'm planning to start working on the mole machine tonight and get the buildings for the Venture Star base cut out at least. My wife is working hard on the scrap yard. She finished the first building for that project last night. I'll probably post it tomorrow.

I did a bit of work on the team 1 minis today. Not much but I have some time to work on them tomorrow. I was planning on working on them tonight but it's getting pretty late and with the other parts of the project I'm planning to work on I'm just not sure if it would be worth while.

Sunday, August 8, 2010

Venture Star's "Big Blue" Finished

I finished up "Big Blue" this afternoon. I'm very happy with the results. I think I spent a little more time on this project than I intended but to overly much. I'm not going to go as all out of the excavator but I'm sure the mole machine will get at least this much detail in the painting.


Here's a shot from the side. As you can see the cab door doesn't look too bad when compared to a 28mm mini.

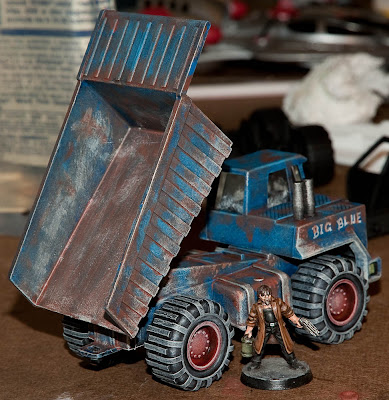
Another final shot with the bed raised. I don't know why but it seems the cheaper the toy the quicker I finish the project. I guess that makes sense. I'm also far more open to experimenting on them as well. Next up I guess will probably be part of team 1 or an update on Rosie's Workshop.


Venture Star's "Big Blue"

I started working yesterday on the vehicles for the Venture Star Prospecting Company. This is Big Blue the dump truck for team 1. This is a WIP shot. I still have to do the weathering. I plan to have the truck finished tonight along with at least one or two of team 1.

Here's another shot from the back with the bed up. In truth this truck is a bit under scale but I think it will work out nicely. The door on the drivers side and the seat and wheel seem pretty close to scale but if your a scale nut it might bother you. I think it makes a fine game prop.

Here is a shot of the dump truck and the excavator torn down for painting. The excavator is going to be tricky to paint. Hopefully I'll get started today.


Here is a shot of the mole machine taken down. It's going to require a lot more work but I think it's going to be worth the effort.
I'm pretty happy with the way things are progressing on the Venture Star project. I also need to get started on their base soon.

Friday, August 6, 2010

Rosie's Workshop

We have finally started working on the building for our space colony/shuttle port. This "Rosie's Workshop" a building my wife is working on. In addition to making as many of the building for the project as playable as possible we are also populating the colony with citizens as we build it. This work shop is part of "Rosie's Repair and Salvage" which will be owned and operated by Rosie and her small army of robotic servitors. We are using "Rosie: Chronotechnition" from Reapers miniatures and several Toolbots and other robots for this particular location.

Here is a shot of the building without miniatures. The structure is made from 1/8th inch white foamcore. The roof is made from a meat package and the pylon supports are made from parts from plastic hair curlers. We're going to make extensive use of these on many of the buildings in this project as support pylons to help achieve that "Space Colony" look.

Here you can see some windows we cut in the roof. We will be adding some clear plastic cut from the package of one of the G.I. Joe vehicles we have purchased recently to glaze them.


We decided to add a little detailing inside the roof that you would be able to see through the windows. The concept behind our colony type buildings is that they are somewhat self sustaining. In addition to heating and cooling they also have water reclamation systems and power generation systems. We will probably be adding a solar power array to the roof as we will be doing to several other buildings. These details are made from the cheapest plastic junk we had and we didn't go all out on them since they will only be a subtle detail. They will be painted up a bit nicer before we put the roof together.

Here you can see a shot of the inside. Again we detailed it with cheap junk. This is a small workshop Rosie will also be using as her house. We will be adding furniture which will mostly consist of worktables and robot parts but will also include a small sleeping space. My wife rigged a simple door system that will slide back and forth on rails.

The outside of the workshop will be covered in "thermal shielding" which was inspired by the Firefly Episode "Heart of Gold". I think there are actually other episodes with similar set treatments but it was very predominate in this episode. We will be using aluminum foil squares to create this effect. I have used this technique before when I made a building for a "Firefly" game I ran. You can see a pic of that building here.

Yeah I was going to say something clever about this being a close up shot of the building but I'm really only showing it because it features the lovely and talented Melinda Clark who played a major role in the episode. Rawr!

Thursday, August 5, 2010

The Wolfhound Legion Freikorps

I put together 6 of my Wargames Factory Shock Troopers as a crew for AE Bounty. These are the Wolfhound Legion Freikorps or at least one of their veteran crews. The Shock Troop figures went together fairly well. I used Testors Liquid Cement to put them together. They went together fairly well. Not as nicely as I would have liked. The flame thrower armed trooper was a particular problem because in order to get his left hand under the weapon I had to rotate both arms so far forward that I'll have to fill in the gaps with green stuff but some of the other multi part plastics I have assembled have similar problems. Also the necks really need to be cut down a bit to sit flush and not be too tall. That's easily dealt with. These guys ended up costing me less than a buck a piece from the Warstore so I feel I got an amazing value. I've mounted them on GW bases because that is what I had laying around.

Here is a shot of their backs. As you can see they come with some nice gear options. I've use the daggers to designate my veteran level units. I thought it would be a nice subtle way to show their status without having to give them markings. It seems sensible that a large mercenary force might award ceremonial "swords" to it's veteran fighters.
Here is how I have set the crew up for AE Bounty:
The Wolfhound Legion Freikorps

Squad 4 Company C 4th Battalion
Veteran Crew

Sergeant: Lars (Human Individual Blooded Warrior Hero)
Experience Level: Veteran
Composition: 1 Mercenary
Equipment: Particle Beam Long Rifle, Light Armored Suit, Slugthrower Pistol
M/3 RC/3+ CC/4 A/4(5) S/2 DR/6 W/3
Abilities:
*Command
*Get up and Shoot!
*Inspiring

Old Guard: Otto and Heinrich (Human Squad)
Experience Level: Veteran
Composition: 2 Mercenaries
Equipment: Slugthrower Rifle, Light Armored Suit
M/3 RC/3+ CC/3 A/3(4) S/2 DR/4 W/1
Abilities:
*Apathetic

Heavy Hitter: Fritz (Human Individual)
Experience Level: Regular
Composition: 1 Mercenary
Equipment: Flamethrower, Light Armored Suit
M/3 RC/4+ CC/3 A/3(4) S/2 DR/3 W/2
Abilities:
*Apathetic

Hired Guns: Manfred and Reinhard (Human Squad)
Experience Level: Regular
Composition: 2 Mercenaries
Equipment: Slugthrower Rifle, Light Armored Suit
M/3 RC/4+ CC/3 A/3(4) S/2 DR/3 W/1
Abilities:
*Apathetic
I have no idea how these guys are going to preform on the battlefield and I plan to make up several other crews so I can demo the game locally. I will also be working up crews from the pirate army I've been working on as well as several of the Sci-Fi minis I own.

Wednesday, August 4, 2010

It's like Christmas in August!


So today the delivery guy dropped off what may be must last serious game purchase in a while. My shiny new copy of AE Bounty and a box of Wargames Factory Shock Troopers. I'm not normally one to pick up things brand new to the market but like many burnt out fans of a certain company and game who will remain nameless I was eager for some new Sci-Fi gaming alternatives. Something less Gothic and more space opera. :) Although you could argue that the Shock Troopers are kinda Gothic at least they aren't dripping with spiky bits and skulls.


The first thing I did was un-box the Shock Troopers. The pictures on the web do not do them justice. They are solidly in the 28-30mm category. Not too big or too small. Just about average in size and they look quite compatible with many of the other Sci-Fi lines. I was concerned about this because I had picked up a package of Wargames Factory Zombies a while back and felt they were under scale compared to most of the lines I use. The box comes with six sprues that each have three troopers and a ton of options.


Just check out all these heads. A couple of helmet options, several gas mask heads. A sergeant head with a side cap and even one head with just hair. There is also the alien head option which looks very Cthulhu inspired.


Here is a shot of two sprues from both sides. I like the level of detail Wargames Factory achieved on this set. Seems pretty crisp and comparable with some of the better multi part plastics out there.


I haven't really had a chance to read the AE Bounty book. I'm writing this blog entry perhaps 45 minutes after the box hit my door step. The book however looks nice. It's got full color illustrations and several nice shots of miniatures from the AE Bounty line although the game makers stress that you can use these rules with any minis and any setting. Darkson Designs do provide a setting for the rules and their miniatures which seems interesting and well thought out but the rules are designed to be generic. I've very excited to see how this game plays out and I hope to have a battle report and better review in a couple of days.

Tuesday, August 3, 2010

Venture Star Prospecting Company: Team 1 painting WIP


I started painting up Team 1 last night and I think they are turning out pretty good despite the crappy base cote. These guys are basically NPC mooks so they aren't getting my best painting effort. In fact I'm going try a new speed painting technique with these guys. I plan to give them a light wash of medium brown after I finish highlighting them and then I'm going to do a dark glaze in the deepest recesses by hand to add some contrast.

Monday, August 2, 2010

Stupid painting mistakes or how to ruin hours of converting.


This is Missouri in August. The heat index today is suppose to hit 110 degrees Fahrenheit and the humidity is insanely high. My garage is even hotter and more humid than the outside. These are not good conditions to spray paint in. In fact they are almost the worst. So after spending a good deal of my Sunday converting these guys I managed to just about ruin them in less than an hour trying to base cote them in really bad conditions. To top it off I grabbed a can a paint I only use for terrain. Although in my defense the terrain I painted with it yesterday came out dead smooth. I thought "hey this will be fine for painting some NPC type minis I don't plan to go all out on anyway".
Man was I wrong. These guys came out really rough. Almost unpaintable and there really isn't much I can do about it. With the kind of converting I did they would be hard to strip and I'm not a big fan of stripping plastics. I feel like and idiot since I've been painting for almost 25 year and this is a pretty newb type mistake.
I'm going to try using some GW foundation paint and probably put it on a little thicker as a base cote than I normally would. Hopefully that will salvage these guys enough to be playable. I've done similar things in the past when I had this issue. It's not ideal but these aren't the most important figs on my table and I didn't expect them to look top notch.
I guess we'll find out.

Sunday, August 1, 2010

Venture Star Prospecting Company: Team 1

I started working on crew members for the Venture Star Prospecting company. This is Team 1 most converted from Game Workshop plastics. It is kind of hard to make military looking miniatures look like civilian workers but I'm going to paint these guys up in bright orange pants and jackets with blue t-shirts which should help sell the fact. I went ahead and decided to give them weapons because as prospectors and not regular miners they are more likely to be in dangerous and contested areas.
Ideally I would rather have specialized miniatures for this project but I don't really have the money at the moment to go out and buy whatever I want so I'm trying to make due with what I have.